header

header

Sunday, June 28, 2015

Door Glass

I got the door glass installed this weekend with no problems. I had already gone through the window regulators, cleaning and lubricating. There was a little bit of straightening of bent bits, too. The original glass was in the trunk wrapped in fabric so it was in pretty good condition.

First I had to put in the door brush thingies that go on each side of the window and are mounted to the door with spring clips. Getting the clips on is a bit of a chore, probably because they were the old ones and were bent a little when they were removed. A little bit of prying open and squeezing shut did the trick. They are pressed onto strips of metal at the top of the door and inside the window slot. Then the brush doodads press into the clips.

Next I lowered the window through the slot a little bit and put the window guides in the metal slots on each end of the window. I lowered the window the rest of the way to hold the guides in place. I had to put a little dab of silicone to secure them in the slots. Then I raised the window to a point where I could mount the window to the regulator using 10mm bolts. There are rubber washers and grommets, too, that protect the window from touching metal. A felt strip goes just behind the glass where it mounts to the regulator. All of the soft bits are there to protect the window from breaking and to keep it from rattling.

The process went pretty smoothly and now the doors have their windows. Another step accomplished.

I bought a new wooden bow for the convertible top and installed that, maybe prematurely. I was reading about how to put the top canvas on and discovered that all of the bows need to be covered in a fabric they call bow drill. It looks like thin cotton fabric. The fabric that goes on the aluminum bows is supposed to be backed with rubber. I wonder where I can get that? Is it even necessary?

The descriptions I was reading about installing the top seemed to indicate that the top fabric should consist of more than one layer of canvas. What I have is only one layer. I need to do more research to find out what to do. Just like everything else on this car, I have been learning by doing. It's a little scary. Let's hope my luck holds and I get the car done without wrecking anything!

Friday, May 22, 2015

Getting the Lights On

I managed to find the knurled nuts that hold the speedometer in and got that done. All the gauges are in place and working. Another step completed. Making the lights work is the next fun electrical project . Could it be as easy as just putting in bulbs? Partially.

I put bulbs in the tail lights and front turn signal lights, hooked up the battery and turned the headlight switch to the first stop. Sure enough, I had running lights. That easy! Next was to check the turn signals. In a previous post I talked about putting the horn ring together. The wiring is a bit complicated because the turn signals are in the horn ring rather than in a separate switch on the columns. Once again I was lucky. The turn signals worked!

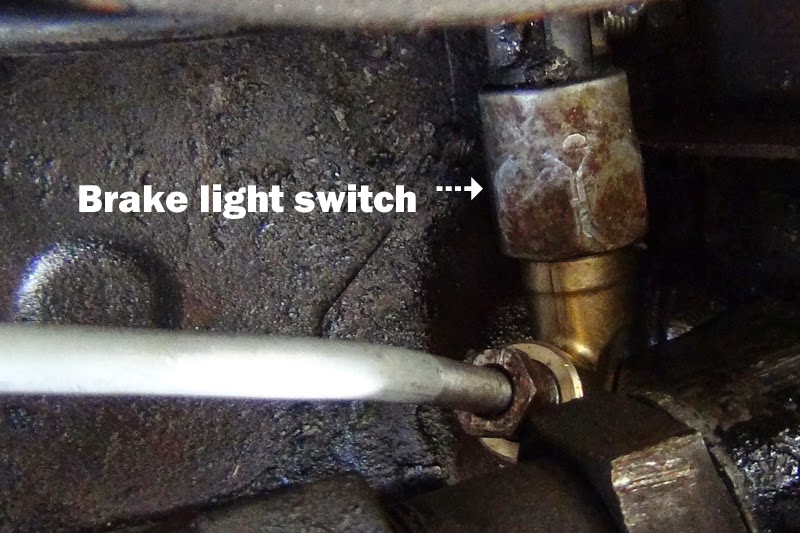
The brake lights are another story. I mentioned in the previous post my issue with having to use a later master cylinder and how that forces a change of where the brake light switch mounts. I decided against a mechanical switch and bought the Y-connector that attaches to the brake booster.

I ran into a problem. The brake booster was mounted too low for the Y-connector to fit. Perhaps the later model cars have a depression in the sheet metal to accommodate the connector. Not ours, though. I had to shim the booster up about 1/4" so the connector fit. Then I had to re-bend the brake line to fit the new connector. I was convinced that it would leak once I got it together, it was such a fussy thing. But no leaks! I bled the upper bleeder screws and now the brakes are even more solid feeling than they were before. And the brake lights work now.

On to the headlights. The right one worked but showed low-beams no matter the position of the foot switch. The left headlight didn't work at all. I took it out and found that there was no connector to the sealed-beam bulb. The wires were cut off at the terminal block. Once this was replaced I tested it. The left headlight now has high-beam but no low-beam. Meanwhile the right headlight is always on low beam. I decided to move on to something else. I'll get back to the headlights later.

Next were the license plate lights. There are two assemblies on each side of the license plate. I found new bulbs for them but that was not enough for them to work. I took them apart and cleaned all the connections with fine sandpaper and got the right one to light. The left one still doesn't work. I'll have to take it apart and clean it more. There is power to the wire that feeds the light assembly so I know it must be a dirty connection.

The instrument lights are a problem. The fuse blows. There is a short in there somewhere. Probably a wire came off one of the instruments and is grounding out. There are about a dozen little lights behind the dashboard and it is practically impossible to see any of the connections due to too much stuff crammed in there. I will have to try to find the loose or missing connection by feel alone. This will take some luck and concentration.

I tested the windshield wiper circuit and it is dead - a project for a later day. The cabin light is likely to work, once I get it installed, but the dash pad needs to be re-done and this light mounts into it so I am going to wait until the dash pad project is completed.

With the brake lights and turn signals working the car is now legal, for day driving anyway. The running lights work and it seems there is just a little bit of fussing to have the headlights working properly. I am going to go ahead and insure the car and notify the Motor Vehicle Department that our 190SL is no longer a non-op vehicle!

Even though it has practically no interior, no glass in the doors, no top, and only one seat, I hope to take it for its first drive on the road soon.

Thursday, April 23, 2015

First Drive (in the yard)

After getting the brakes put together in December I totally slacked off for four months. I was busy with other things. Now I am back at it. There were still a few little things to do on the car before taking the first test drive. The carburetors were still leaking gas out of the throats so I switched from the electric fuel pump back to the original diaphragm fuel pump. After looking at it closely I realized that it had probably been rebuilt so I thought it might work.

Diaphragm fuel pump
I did this because it is possible that the electric fuel pump was overwhelming the float needle valves. An electric fuel pump puts the same amount of pressure out no matter what the engine speed is. The diaphragm fuel pump increases the fuel delivered as the engine revs up so, at low RPM, the fuel pressure should be much lower. That was the theory, anyway.

I also had to figure out why the battery was not being charged when the engine was on. I traced the wiring and discovered that the fat wire going from the voltage regulator to the starter was just green dust for several inches. I replaced the bad section of the wire and re-mounted the voltage regulator on new rubber grommets.

The two carburetors with the air log removed.
Now it was time to start the car and see whether my repairs worked. It was hard starting since the car had sat for four months. The diaphragm fuel pump is a lot slower to suck gas from the tank than the electric pump was. Eventually it started and, lucky me, the charging light was off and the battery was charging.

I did not have the air log attached to the carburetors because I wanted to see if gas was still leaking out of the throats. The throttle return spring attaches to the air log so I had to improvise one from a bungie cord. It looked funny but it worked. After the car had warmed up a bit I stuck my finger in each of the carb throats to feel if there was gasoline. Only one of the four throats was damp - a significant improvement.

So the car is running and I have brakes. Why not take it for a drive around the yard? I grabbed the video camera, handed it to my wife, Nita, and prepared for its first, very short, drive in over 30 years. Here is the video.

You will notice white smoke coming out of the exhaust at the end of the video. This is because the one carburetor is still running too rich. I figure that I need to remove the float and needle valve on the offending carb and soak it in carburetor cleaner. That might do the trick.

I only drove it in the yard for two reasons. None of the lights work. No brake lights or turn signals or anything. And I haven't insured the car yet. It is not yet legal. My next step is to work on the electrical system and try to get all the lights and instruments working.

I started with the horn. It was pretty easy. I cleaned all the fuse connections and, when I was done, the horn worked. Next I worked on the brake lights. Once again, sanding the connections with 220 grit emery paper did the trick. I didn't have to do any re-wiring. The brake light bulbs work but I don't have a working switch.

This is a bit of a story. The early master cylinders had a port in the end where a pressure-actuated switch controlled the brake lights. The later master cylinders did not have this port. Instead there was a Y-connector attached to the brake booster where the pressure switch would mount. I needed to replace the master cylinder but the early style was not available. I could only get the later style. My brake booster does not have the Y-connector so there is no place to attach the switch. I am considering going with a generic mechanical switch instead of messing with the brake lines.

On to the next bit of electrical fun. The gas gauge was not working. I tried wiring the sending unit a couple of different ways but the gauge either was pinned at full or pinned at empty. I re-checked the wiring at the sending unit and was temporarily confused because there were three wires connected to it and the wiring diagram said there was only supposed to be two. I traced the wires and discovered that one of them was an extra ground wire. Instead of fixing the stock ground wire, someone just added another wire and attached it to the chassis in a different place. I tested the gauge after I restored the wiring to what it was supposed to be but the gauge was still pinned at full.

I took the sending unit out of the tank and connected an ohm meter to it to see if different positions of the float had different resistances. It seemed to be working fine. The problem must be either in the wiring from the tank to the gauge or at the gauge itself.

The wiring was fine so I removed the gauge from the dashboard and checked the connections. The little rings on the ends of the two wires had red paint on them from when the car was repainted. I sanded the connectors and re-connected them. Still not working. On a whim I reversed the wires at the gauge and tested again. This time it worked! It was wired backwards!

There is very little room behind the dashboard to work on stuff. There are way too many wires and cables back there! While I was trying to get the fuel gauge out, the speedometer fell out. It was just pressed in its hole but not attached. Trying to get it back in and attached properly is a bear. I still haven't gotten it in correctly. I just found out that, instead of the nuts I used to attach the mounting bracket, I am supposed to be using these little brass knurled knobs. I wonder if I even have those?

I am happy to be making progress again with the car. Tracing each electrical problem is slow work but I am getting there. The next electrical project is to get the turn signals working. Stay tuned!

Saturday, December 20, 2014

Brakes!

After a lot of fussing the car finally has brakes! But before that happy result, there were a lot of little problems - leaks. At one point, a few weeks ago, we had the brake system all put back together and were in the process of bleeding the wheel cylinders. I was in the car. The car was up on the lift, and my helper/advisor was below doing the bleeding. I started to feel some pedal, finally, and just when I was starting to think that we were just moments away from having the brakes working, a leak occurred at the left rear wheel cylinder. Bummer.

We decided that I needed to buy a whole new set of copper crush washers and probably replace all of them. Since we were unable to continue working on the brakes we decided to start the car up and check out the carburetors. The engine started fine but shortly after starting, a lot of white smoke was coming out of the exhaust pipe. My first thought was that my rebuild of the brake booster failed and we were getting brake fluid sucked into the carbs. I disconnected the brake booster and plugged the vacuum hose to see if that helped. No. Still a lot of smoke.

Then we took the air log off of the carburetors so we could see better what is going on. Gasoline was pouring out of the carb throats and onto the exhaust manifold and we had a very short but scary fire in the engine compartment. Fortunately it was put out really quickly and no damage was done.

What we thought was going to be a good day, getting the brakes working, turned into a bad day very quickly.

The next time I went to town to work on the car I had crush washers, new gaskets for the carb float bowls and new bleeder screws. We replaced all the washers at the wheel cylinders and tested the brakes. Another leak! This time at the front left wheel. We took off the brake lines and discovered that the spot on the wheel cylinder where the line goes in was badly scored. We had to take the wheel cylinder out of the wheel, which meant taking the whole brake assembly apart. I ground the back of the wheel cylinder flat to take out the groove in it and put it back together. Finally no leaks. We got brakes working! Yay! Then I discovered a small leak at the brake booster.

The brake booster
We moved next to the carburetors. I took the float bowl covers off and removed the float valve assemblies. the valve was stuck. After soaking them in carb cleaner they moved freely and we put it all back together and fired up the engine. This time it took quite awhile before some gas started barely seeping out of the carburetor throats. There is a lot less smoke coming out of the exhaust, too. Progress is being made at least. There is still too much gas going in. We tried adjusting the mixture but that's not the problem. I need to soak the float valves some more to see if that helps. I also am going to hook up the diaphragm fuel pump to see if that is better. The idea is that the electric fuel pump is pushing just a little too much pressure for the float valve to stay shut. It's a low pressure fuel pump but maybe not low enough pressure.

While running the engine I thought I would check the charging voltage. Not charging. The generator is not generating or the voltage regulator is not regulating. Something wrong anyway. I looked down in there and could see that the wires to the voltage regulator look pretty bad. Maybe something is unhooked. We ran the engine for about 20 minutes until it got up to temperature. The cooling system seems to be good. It steadied out at about 170 degrees. We turned off the engine and then I noticed a leak in the cooling system. There is a fitting coming out of the middle of the cylinder head and there was a leak at the hose. I took the hose off and the fitting is mostly rusted away. I managed to push the hose on far enough to get it to seal so it's OK for now. Eventually I will have to replace the steel tube.

The day was over, though, and no more time to work on stuff. We got everything done that needs to be done from underneath the car so I figured I could finish working on the carburetors and fix the electrical problems at home since that can be done from above.

The next day I brought my trailer to town, loaded up the car and took it home. It is now safely back in its garage. Only now it has brakes! I figure half a day's work on the carbs might get them sorted out. Then generator charging issue is an unknown. the small brake fluid leak at the brake booster should be fixed by replacing the crush washers. I remember re-using the old ones at that spot when I put it together.

I am another step closer to driving the car, at least around our yard.
Nita ready to steer as I push it into its garage.

Saturday, October 25, 2014

Further Down the Rabbit Hole


October, 1955 issue
I am deep into mechanical work on the car now and I haven't been taking many photos. This is for three reasons. 1. I am too busy working on it to remember to take pictures of the process, 2. My hands are too greasy to want to touch the camera, and 3. Any photos would be of engine and brake parts and probably not all that interesting to look at. So, because a blog post is always more entertaining if there are pictures in it, I am including vintage 190SL photos that I found on the web.

You never know how much trouble you are in for when resurrecting an old car. I got a new brake master cylinder but it is not exactly the same as the old one. The exact one is not available, apparently. Here is the possibly boring story.

1955 was the first year of 190SL production. That first year did not have a brake booster so the master cylinder was designed to work without one. In 1956, the year of our car, they started using brake boosters and a different master cylinder. For two years, 1956 and 1957, the brake light switch, which operates on brake fluid pressure, was attached to the end of the master cylinder. In 1958 they moved the brake light switch to the brake booster. The hole in the master cylinder where the switch used to go is now sealed off. The only master cylinders available now are designed for 1958 and newer cars. So we have to find somewhere else to put the switch.

To do this so that it matches the way Mercedes designed it requires the purchase of more parts. There is a "Y" fitting that costs $45. But this fitting is pretty thick so I would have to buy the hollow bolt that mounts it ($28). Then I would have to get a different switch because the mounting holes are different sizes. I can't even find that part.

What I think we will do is just put a generic pressure switch in the brake line that goes between the master cylinder and the brake booster. This will work fine even though it is not the way the car was originally put together.
A rendering from the 1957 190SL dealer catalog

The carburetors are another rabbit hole I am falling down and don't know how far it will go. This car has its original Solex carbs. I am SO glad I have these! To buy new ones would cost an unbelievably huge amount of money. Fortunately I don't have to buy new ones. The ones I have are leaking from the bottom though. Perhaps it's just a couple of gaskets?

I checked a diagram of the carb. It is not a couple of gaskets. What is leaking are the accelerator pump diaphragms. Maybe the cover plates just need to be tightened. I will try that next time I work on the car. If  the diaphragms are bad they will have to be replaced. A pair of new ones costs $320. Ouch!

I am missing all except one of the gaskets for where the air intake plenum (190SL folks call it an air log) attaches to the carburetors. They are paper gaskets and aren't that expensive but even cheaper is to make them myself using gasket material. That's what I will do. I will use the one that I have as a template and cut three more and it should be good.

On the assembly line in February, 1958
There are two carburetors linked together on this engine. The fuel lines are a bit complex. The one that connects to the rear carb needs to be replaced. Unfortunately I cannot just buy that piece. I would have to buy the whole assembly which is $350. I think we will try to make just the piece we need and not replace the whole assembly.

When looking closer at the carbs we noticed paper stuck in two of the ball and cup linkage fittings. This must have been because they were popping out due to wear in the fittings. I am sure the paper won't last long so I will have to order some new ones. Fortunately these are not expensive.

We pressure-washed the underside of the car this afternoon. There was a lot of oil, grease and dirt under there. We got it mostly clean and then put it up on the lift to inspect it all. There are about 30 grease fittings!  Every moving part of the front and rear suspension had one or two fittings. We greased them all so they should now be good.

Not everything is bad news on the way down the rabbit hole. We discovered that the center link tie rod was loose and, fortunately, it was just a big nut that needed tightening. A super easy fix. We discovered that the differential is not leaking gear oil. What we thought was gear oil was just old grease that had broken down. We also inspected a rubber boot that often goes bad on the rear swing axle. It turns out that it was replaced with a new one back when the car was being worked on in the early 80's. It is in perfect shape.

This truck is awesome!
The drain plug on the oil pan is all rounded off so I am going to order a new one. Lucky for me it is inexpensive and not hard to get. The valve cover gasket also needs replacing. It's not super cheap but it's not expensive either. Only about $30.

I have been working on this car for about a year and a half now in my spare time. It is starting to feel sometimes like it will never get done. There is so much left to do! But every time I work on it some small bit of progress is made so I suppose, at some point, I will actually get in the car, start it up, and drive around. Between now and then, though, I am sure there will be plenty more discoveries both pleasant and unpleasant.

Will the accelerator pump diaphragms need replacing? Will we get a brake light switch to fit the way we want it to? Will I be able to successfully get the brake booster back together? Will the brakes even work when the whole system is fully assembled? Stay tuned!
This pic is from the 1957 dealer catalog

Sunday, October 19, 2014

The Big Push

Last Tuesday I loaded the car on my trailer for a trip to a friend's auto repair shop. He has lifts and a huge selection of tools as well as people who are used to working on cars all the time, unlike me who is a dabbler. The plan was to install all the new brake parts, fix or repair other brake parts, and get a look at the underside of the car to see what else it needs.

I had a helper, but really I was his helper. Nick has been working on cars his whole adult life and has the skill and confidence that I don't have. I always get frustrated when something doesn't come apart easily and I often end up breaking things. He knew just how to get stuck things unstuck.

We got it up on the lift and started working. The first project was to remove the brake master cylinder which is in a spot that would be extremely difficult to get to if the car was on the ground or even up on jack stands. Up on the lift, it was much easier but still a challenge. Nick worked on this while I took the wheels and hubs off and got all the brake parts for the wheels ready to install.

We spent all day working on the car and got the master cylinder removed, the front brakes done and one of the rear brakes. I repacked the front wheel bearings, too. The master cylinder was pitted, as I suspected, so I ordered a new one. It should be here tomorrow. I thought about sending the old one to be re-sleeved but that would take a couple of weeks. The new one will get here sooner.

Nick discovered that the center link tie rod needed to be replaced. Fortunately I have one that was bought for the car 30 years ago and never put on. Also the oil pan and differential leak so we will try to do something about that while the car is there.

The first wheel cylinder gets installed
The next day I couldn't go to town to work on the car but Nick finished putting the wheel cylinders in and fixed a steel brake line that I messed up when I was taking the brakes out of the car. So great that he can do this!

Thursday was another day in town for me. All of the bays at the shop were in use so we couldn't put the car up. I spent an hour or two trying to get the brake booster out of the car. Some of the mounting bolts were rusted and it is not an easy thing to remove anyway. Part of the process means lying under the dashboard. I am a big guy and it's a small car. I was pretty crammed in there but got it out. The plan was to take the brake booster home and disassemble it to see what it needs.

I did that today. It was a challenge. The case was stuck shut by rust and gunk. I eventually got it apart, though, and cleaned all the parts I could get apart. Most of it looked really good once it was cleaned. There are a couple of rubber gaskets that need to be replaced for sure. The power piston is the biggest one and it is designed to move air, not brake fluid. The gasket on it is made of leather! Fortunately it's in good shape.

brake booster mostly taken apart
The brake booster uses the engine vacuum to assist in pushing brake fluid to the wheels. It's a complicated piece of equipment. I hope I can get it to work without too much expense. Buying a new one is out of the question. New ones cost almost $2000! If I need to get a rebuild kit I will have to spend just under $300. It is possible that I can find generic replacements for the rubber washers that I know are in bad shape. We will see how it goes.

Next week I will be back at the shop installing the new master cylinder, replacing the tie rod, and fixing the leaks in the oil pan and differential. It will take longer to get the brake booster done. If I am too excited to drive it we might bypass the brake booster. The car doesn't weigh much so not having power brakes should not be too big a deal.

My hope, before I started this big push, was that the car would be marginally drivable by this Thursday, which is my birthday. I am beginning to doubt that we can get it together in time but maybe?

Monday, October 13, 2014

Documentation Exploration

I found out through the 190SL Group forum that you can send away to Germany for a copy of the original build sheet for any Mercedes. All you need is the VIN number. So I sent our VIN to the Mercedes Benz Classic Center and the guy there sent it to Germany. A few days later I got a digital copy of the build sheet. There was a problem, though.

Everything is in German and the copy is quite faded and distorted. Remember that this piece of paper was almost 60 years old! Anyway, from what I could determine, this build sheet was for another car, not ours! It said that the car with this VIN number was a coupe, not a roadster, and that it was originally metallic gray with red upholstery. Ours should have been red paint with black upholstery. Definitely not our car. So I had to do more research.
wrong car!
It turns out there are three numbers associated with these cars. There is the chassis number, the body number and the engine number. Most of the time the chassis number became the VIN. On our car the body number was selected to be the VIN. I don't know why or how rare this is or if it is a problem. The car has been in our family since 1975. Probably not a problem.

Chassis number plate on firewall behind the battery
With 190SL's the whole "numbers matching" thing doesn't apply. With 190SL's the three numbers almost never matched, not even the very first cars. I read that. on the first two 190SL's made, the car with chassis number 5500001 had body number 5500002 and the chassis number 5500002 had body number 5500001. It really didn't matter to the guys at the manufacturing plant. Our car has a new engine in it so that number definitely will not match what was originally put in the car.


Body number plate on driver's side door jamb.
Our car's body number is 6502520 and the chassis number is 6503849. The first two digits depict the year it was made, in reverse. So the 65 means that it was made in 1956. The next five digits are the production number. In 1956 they built 4032 cars. Ours was number 3849 of that production year which would indicate it was made late in the year. The official production numbers from Mercedes aren't completely correct, though. Here's a link to a page that describes the production over the years and how Mercedes sort of fudged the numbers.

190SL's were hand built. Each body part has the body number on it, at least the last four digits of the body number. Only number-matched body parts fit together properly. On our car you can find the number 2520 stamped or written on the body parts. I even found it in chalk on the inside of the back of the driver's seat.

There is another chassis number plate mounted to the frame of the car. Above the plate, the same number is stamped into the frame below the voltage regulator. It is facing up so it can be really filthy with oil and dirt. I scrubbed ours off but you can barely make it out. Not an easy place to get to either. I couldn't read it at all just by looking at it. I had to use a flashlight and stuff my camera down there, take a picture, and blow it up in order to see that it is the same number as the plate behind the battery.

An unusual thing about 190SL's is the year the car was built is often not the year shown on the title. The cars were registered the year they were sold, not the year they were built. So our car is registered as a 1958 but it was built in 1956. I figure that it probably doesn't really matter as far as the legal stuff goes but it is important to know the year it was made to get the right parts.

When I registered it here in AZ, I didn't bother to try to change anything. I suspected that might turn into a bureaucratic nightmare. Still, it would be cool if, someday, I could get the title changed to show the year of manufacture and to have the chassis number be the VIN like most of the other cars out there. Or maybe it doesn't matter at all.

Now I have to bother the Classic Center again with a new number (the chassis number) and ask them to send to Germany for the build sheet that actually belongs to this car.

I will end this post with something much prettier than these dirty number plates and faded documents. I found a model of our car in a thrift store for $15. Cool, huh?