header

header

Saturday, December 12, 2015

New Motor Mounts

 In an earlier post I mentioned that the first time we took the car for a drive on actual streets it made a lot of noise. This was because, among some other things, the fuel pump was vibrating against the steering box due to bad front motor mounts. Well, that problem is fixed now.

I ordered up a pair of new, aftermarket, motor mounts from 190SLparts.com and we put them in on Wednesday. It was super easy to do. It can be done from above so there was no need to put the car up on a lift. We jacked up the engine to relieve the weight, unbolted and slid the old ones out, and slid the new ones back in. The old mounts were totally collapsed. The right one had even come apart. Now that the new ones are in, the engine sits almost an inch higher. It needs rear mounts, too, but the supplier was out of them.

Since I had the car in my friends' shop for this, we put it up on the lift anyway so I could check for leaks and see how everything looks. The car has about 40 miles since its resurrection and new leaks are likely to turn up. The last time we had it on the lifts I spotted a leak where the fuel line attaches to the gas tank. I tightened a fitting and hoped for the best. This most recent inspection shows the leak has been healed. I am losing a little brake fluid somewhere and we saw a spot on the right rear wheel that indicates a possible leak. We didn't do anything about it yet. The only other possibility is that brake fluid is leaking into the air chamber in the brake booster. That's a pain to fix. I hope it isn't the booster.

After changing the motor mounts I took it for a drive. So quiet and smooth now! It really made a difference in how the car feels. I drove it on a few errands and then took a longer drive out a mountain road to see how the car handles. It was great!

It's mid-December now and I picked the warmest day of the week to take the drive. It was in the mid-60's. Not warm, but not bad, either. There is still no fabric on the convertible top so that may be the very next thing I try to do. With the top on I could drive it in cooler weather without freezing my ass off.

Another project in the car's near future is to get the heater working. I haven't even looked into this. There are some cardboard air channels that are not in good shape. I may have to repair them rather than get new ones. I don't know if the fan works or if the heater core is sound. The work goes on!

Friday, November 27, 2015

Lost a Bet

This car was auctioned at Mecum Anaheim, 2015 for $180k
A friend and I had a bet on what another 190SL would go for at the Mecum Anaheim auction. We were both way off. He guessed $125k and I guessed $100k. It went for $180k! It was an older restoration so I thought it would go for less. You never know with auctions and, of course, it's hard to tell that much about a car by looking at a tiny photo on the internet.

Whoever lost the bet had to buy lunch at In-N-Out Burger. That was me. I figured it would be fun to pick up my friend in our 190SL, so I loaded the car on my trailer and hauled it to town. We had fun driving around in the cute little car on a warmer-than-usual November afternoon. It ran great! And we enjoyed good burgers.

At Prescott Cars and Coffee, November, 2015
The next day I took it to Prescott Cars and Coffee in Prescott Valley. It's a local version of the famous event in Southern California. This was our car's longest drive yet, about 20 miles round trip, and it was awesome to be driving it. The event wasn't quite what I expected. There were very few vintage cars. It was mostly tuners. It was fun to see a new generation of automotive enthusiasts enjoying their cars and each other. Not my scene, though. This was the third time it was held ( on the third Saturday of each month). It has been a different bunch of cars each time so maybe future events will have more vintage and exotic cars. I'll probably go again.

I met Robert Webster, another Mercedes restorer, at Cars and Coffee. His shop, Webster Workstatt, is in Phoenix and he used to work with Jared King, the restorer I know in Prescott. He mostly does the mechanical end of the restoration but is starting to get into the whole thing. Small world. I can't imagine there are many more people in AZ who specialize in restoring the old 190SL and 300SL Mercedes. They may be the only two! I'd post Jared's web site but I don't think he has one. He specializes in bodywork, paint and meticulous assembly of the cars.

Good friends of ours, Bill and Laurel, have a small empty garage at a property they own in the middle of Prescott and they graciously offered to let me store the car in it. This is great! One of the reasons I am not driving the car enough is because I would have to load it and unload it from my trailer every time I brought it to town from our house. Now I can just go to the little garage and drive the car.

Our car in the backyard of our rental house in Prescott.
It doesn't have a top yet, or a heater hooked up, so I will still not be driving it much for the next few months. It's just not that warm here for convertibles in mid-winter. I will probably bundle up and do it anyway, at least a couple of times. This could also be an incentive to install the top fabric and maybe even fix the heater.

Thursday, November 5, 2015

Old Photos, Ads, and Posters

I have been too busy with other things to work on the 190SL the last three weeks. I did get new motor mounts sent to me and I now have the bow drill which is the fabric that wraps all the bows on the convertible top.

Next week, if I can, I will get the new motor mounts installed. Not sure when I will tackle the convertible top project. I have to get psyched up for it. Having not done anything like this before, I don't want to do it wrong. Really, all I want to do is drive the car but the weather has been wet so no driving until things dry out a bit.

For entertainment one evening I searched the web for old ads, photos, and posters of 190SLs and other Mercedes from back in the day. Here are some of them. Enjoy!


Thursday, October 15, 2015

Noises on the Street

Last month I decided the car was put together enough to take a real test drive. I loaded it on my trailer so we could take it to town. Then we got so busy with other stuff that we couldn't find an open day for its first drive on city streets. It sat on the trailer for three weeks but didn't go anywhere. Until yesterday.

I hitched the trailer up to the F250 Tuesday morning and my wife, Nita, and I headed down our 16-mile dirt road and another 24 miles of paved road to the parking lot behind our friend, Jared's, shop in Prescott. He specializes in restoring old Mercedes so we figured it was the best place to start our test drive. If something went wrong, we had an expert on hand.

I started it up and we took a spin around the parking lot. The car was noisy but it all seemed pretty OK so we decided to take a little bit longer loop - about 2 miles. On this loop the car got noisier. There was an engine noise that vibrated the whole car plus it sounded like there was a rock or something rattling around in the right front hubcap.

When we got back to Jared's shop we took the noisy wheel off and found that one of the pins that holds the auto-adjusting part of the brake had extended too far out and was grinding a groove in the aluminum brake drum. He popped it out and put a washer behind the cotter pin so that it wouldn't stick so far out and that noise was fixed. Easy!

We decided to drive a longer loop. We took it where we could use all of the gears, which worked fine, but the car made even more noise. The engine vibration was worse and there seemed to be noises coming from all four wheels and just about everywhere else, too. The car sounded like an airplane dragging cans of bolts down a runway. We could hardly hear each other speak. We abandoned our plans to drive it to lunch. Jared said he thought it was a successful drive since it made it back to the trailer without dying out on the road somewhere, but it sounded bad. Really bad.

The next day I took the car to Rich Biel's  automotive repair shop so we could put it up on a lift. Chris was the lucky mechanic assigned to help me figure out what was causing the noise and how to fix it. The plan was to start with the loudest noise first. It turns out that the motor mounts are shot and the front ones had collapsed enough that the fuel pump was hitting the steering box. That was the source of the vibration. I ordered new mounts but they won't get here for a week. In the meantime, Chris put shims under the front mounts to raise the engine up just enough so it doesn't rattle against the steering box. When I started the car, the difference made me smile. It no longer sounded like an airplane. It sounded like a normal car. Almost. There were all the other noises to deal with.

The next target was to take both front wheels off and re-mount all four of the pins that hold the automatic brake adjustment washers in place. It turns out that the cotter keys holding the pins in place were too small and allowed the heads of the pins to drag on the brake drums. Bigger cotter pins were in order plus some washers just for good measure. The dragging-can-of-bolts noises should be gone.

Now for loud rattle number three. We found that the exhaust system was not attached to the frame in a key place, was attached badly in another place and, as a result, the muffler was rattling against the car's body. Chris got some generic exhaust brackets and adapted them so that the whole system was attached at the correct spots with rubber to absorb the vibrations. This moved the muffler up slightly - just enough to clear the body. Another problem solved.

While the car was up on the lift we discovered that the gas tank was leaking at one of the gas line fittings. That took a few more minutes to tighten up. We are not sure we fixed it, though. Time will tell. I also noticed a hole in the bell housing where there shouldn't be one. Apparently the clutch had exploded at some point in the past and something punched a silver dollar-size hole in the side. It's in a spot where it shouldn't cause any problems, though. Best to leave this one alone. A new bell housing probably costs a fortune if it is available at all.

Now for the second test drive. Wonderful! It was so much quieter! I could actually hear the engine run instead of listening to it vibrate against the frame. It sounded damn good to me. I drove it around some more, went to the store, visited some friends to show it off, and stopped by Jared's shop. He admitted that he was trying to be supportive the day before, and only said nice things, but he was thinking, "what a pile of junk!" The difference between Wednesday's drive and Tuesday's drive was amazing. It was a different car. A really fun car!

Of course there are still lots of things to work on. The interior needs to be done. There are still some lighting and electrical issues, and there are still some noises to deal with. Fortunately they are practically insignificant noises, some of which will go away by themselves and some will be muffled when the carpet kit goes in and the rubber for the doors and trunk is installed. I doubt it will ever be as quiet as a modern car but it will sound and feel the way it did when my brother, Rick, and I drove it to the mountains to go rock climbing back in the 70's.

Sunday, June 28, 2015

Door Glass

I got the door glass installed this weekend with no problems. I had already gone through the window regulators, cleaning and lubricating. There was a little bit of straightening of bent bits, too. The original glass was in the trunk wrapped in fabric so it was in pretty good condition.

First I had to put in the door brush thingies that go on each side of the window and are mounted to the door with spring clips. Getting the clips on is a bit of a chore, probably because they were the old ones and were bent a little when they were removed. A little bit of prying open and squeezing shut did the trick. They are pressed onto strips of metal at the top of the door and inside the window slot. Then the brush doodads press into the clips.

Next I lowered the window through the slot a little bit and put the window guides in the metal slots on each end of the window. I lowered the window the rest of the way to hold the guides in place. I had to put a little dab of silicone to secure them in the slots. Then I raised the window to a point where I could mount the window to the regulator using 10mm bolts. There are rubber washers and grommets, too, that protect the window from touching metal. A felt strip goes just behind the glass where it mounts to the regulator. All of the soft bits are there to protect the window from breaking and to keep it from rattling.

The process went pretty smoothly and now the doors have their windows. Another step accomplished.

I bought a new wooden bow for the convertible top and installed that, maybe prematurely. I was reading about how to put the top canvas on and discovered that all of the bows need to be covered in a fabric they call bow drill. It looks like thin cotton fabric. The fabric that goes on the aluminum bows is supposed to be backed with rubber. I wonder where I can get that? Is it even necessary?

The descriptions I was reading about installing the top seemed to indicate that the top fabric should consist of more than one layer of canvas. What I have is only one layer. I need to do more research to find out what to do. Just like everything else on this car, I have been learning by doing. It's a little scary. Let's hope my luck holds and I get the car done without wrecking anything!

Friday, May 22, 2015

Getting the Lights On

I managed to find the knurled nuts that hold the speedometer in and got that done. All the gauges are in place and working. Another step completed. Making the lights work is the next fun electrical project . Could it be as easy as just putting in bulbs? Partially.

I put bulbs in the tail lights and front turn signal lights, hooked up the battery and turned the headlight switch to the first stop. Sure enough, I had running lights. That easy! Next was to check the turn signals. In a previous post I talked about putting the horn ring together. The wiring is a bit complicated because the turn signals are in the horn ring rather than in a separate switch on the columns. Once again I was lucky. The turn signals worked!

The brake lights are another story. I mentioned in the previous post my issue with having to use a later master cylinder and how that forces a change of where the brake light switch mounts. I decided against a mechanical switch and bought the Y-connector that attaches to the brake booster.

I ran into a problem. The brake booster was mounted too low for the Y-connector to fit. Perhaps the later model cars have a depression in the sheet metal to accommodate the connector. Not ours, though. I had to shim the booster up about 1/4" so the connector fit. Then I had to re-bend the brake line to fit the new connector. I was convinced that it would leak once I got it together, it was such a fussy thing. But no leaks! I bled the upper bleeder screws and now the brakes are even more solid feeling than they were before. And the brake lights work now.

On to the headlights. The right one worked but showed low-beams no matter the position of the foot switch. The left headlight didn't work at all. I took it out and found that there was no connector to the sealed-beam bulb. The wires were cut off at the terminal block. Once this was replaced I tested it. The left headlight now has high-beam but no low-beam. Meanwhile the right headlight is always on low beam. I decided to move on to something else. I'll get back to the headlights later.

Next were the license plate lights. There are two assemblies on each side of the license plate. I found new bulbs for them but that was not enough for them to work. I took them apart and cleaned all the connections with fine sandpaper and got the right one to light. The left one still doesn't work. I'll have to take it apart and clean it more. There is power to the wire that feeds the light assembly so I know it must be a dirty connection.

The instrument lights are a problem. The fuse blows. There is a short in there somewhere. Probably a wire came off one of the instruments and is grounding out. There are about a dozen little lights behind the dashboard and it is practically impossible to see any of the connections due to too much stuff crammed in there. I will have to try to find the loose or missing connection by feel alone. This will take some luck and concentration.

I tested the windshield wiper circuit and it is dead - a project for a later day. The cabin light is likely to work, once I get it installed, but the dash pad needs to be re-done and this light mounts into it so I am going to wait until the dash pad project is completed.

With the brake lights and turn signals working the car is now legal, for day driving anyway. The running lights work and it seems there is just a little bit of fussing to have the headlights working properly. I am going to go ahead and insure the car and notify the Motor Vehicle Department that our 190SL is no longer a non-op vehicle!

Even though it has practically no interior, no glass in the doors, no top, and only one seat, I hope to take it for its first drive on the road soon.

Thursday, April 23, 2015

First Drive (in the yard)

After getting the brakes put together in December I totally slacked off for four months. I was busy with other things. Now I am back at it. There were still a few little things to do on the car before taking the first test drive. The carburetors were still leaking gas out of the throats so I switched from the electric fuel pump back to the original diaphragm fuel pump. After looking at it closely I realized that it had probably been rebuilt so I thought it might work.

Diaphragm fuel pump
I did this because it is possible that the electric fuel pump was overwhelming the float needle valves. An electric fuel pump puts the same amount of pressure out no matter what the engine speed is. The diaphragm fuel pump increases the fuel delivered as the engine revs up so, at low RPM, the fuel pressure should be much lower. That was the theory, anyway.

I also had to figure out why the battery was not being charged when the engine was on. I traced the wiring and discovered that the fat wire going from the voltage regulator to the starter was just green dust for several inches. I replaced the bad section of the wire and re-mounted the voltage regulator on new rubber grommets.

The two carburetors with the air log removed.
Now it was time to start the car and see whether my repairs worked. It was hard starting since the car had sat for four months. The diaphragm fuel pump is a lot slower to suck gas from the tank than the electric pump was. Eventually it started and, lucky me, the charging light was off and the battery was charging.

I did not have the air log attached to the carburetors because I wanted to see if gas was still leaking out of the throats. The throttle return spring attaches to the air log so I had to improvise one from a bungie cord. It looked funny but it worked. After the car had warmed up a bit I stuck my finger in each of the carb throats to feel if there was gasoline. Only one of the four throats was damp - a significant improvement.

So the car is running and I have brakes. Why not take it for a drive around the yard? I grabbed the video camera, handed it to my wife, Nita, and prepared for its first, very short, drive in over 30 years. Here is the video.

You will notice white smoke coming out of the exhaust at the end of the video. This is because the one carburetor is still running too rich. I figure that I need to remove the float and needle valve on the offending carb and soak it in carburetor cleaner. That might do the trick.

I only drove it in the yard for two reasons. None of the lights work. No brake lights or turn signals or anything. And I haven't insured the car yet. It is not yet legal. My next step is to work on the electrical system and try to get all the lights and instruments working.

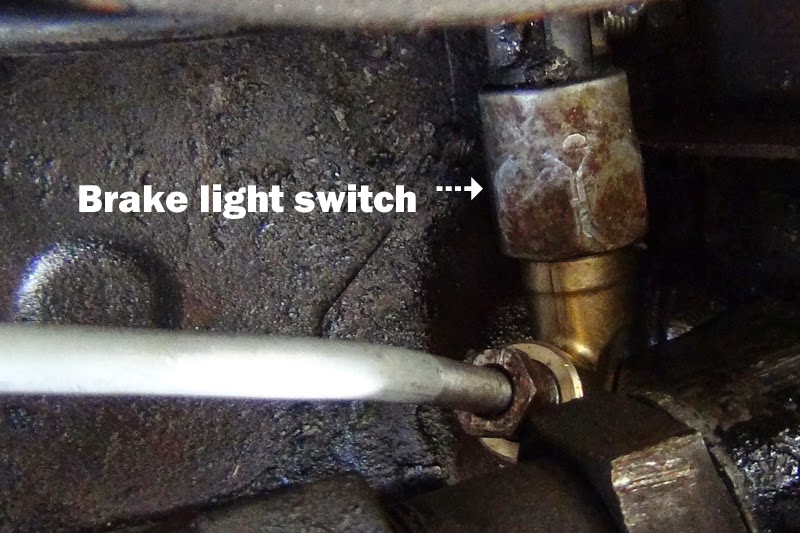
I started with the horn. It was pretty easy. I cleaned all the fuse connections and, when I was done, the horn worked. Next I worked on the brake lights. Once again, sanding the connections with 220 grit emery paper did the trick. I didn't have to do any re-wiring. The brake light bulbs work but I don't have a working switch.

This is a bit of a story. The early master cylinders had a port in the end where a pressure-actuated switch controlled the brake lights. The later master cylinders did not have this port. Instead there was a Y-connector attached to the brake booster where the pressure switch would mount. I needed to replace the master cylinder but the early style was not available. I could only get the later style. My brake booster does not have the Y-connector so there is no place to attach the switch. I am considering going with a generic mechanical switch instead of messing with the brake lines.

On to the next bit of electrical fun. The gas gauge was not working. I tried wiring the sending unit a couple of different ways but the gauge either was pinned at full or pinned at empty. I re-checked the wiring at the sending unit and was temporarily confused because there were three wires connected to it and the wiring diagram said there was only supposed to be two. I traced the wires and discovered that one of them was an extra ground wire. Instead of fixing the stock ground wire, someone just added another wire and attached it to the chassis in a different place. I tested the gauge after I restored the wiring to what it was supposed to be but the gauge was still pinned at full.

I took the sending unit out of the tank and connected an ohm meter to it to see if different positions of the float had different resistances. It seemed to be working fine. The problem must be either in the wiring from the tank to the gauge or at the gauge itself.

The wiring was fine so I removed the gauge from the dashboard and checked the connections. The little rings on the ends of the two wires had red paint on them from when the car was repainted. I sanded the connectors and re-connected them. Still not working. On a whim I reversed the wires at the gauge and tested again. This time it worked! It was wired backwards!

There is very little room behind the dashboard to work on stuff. There are way too many wires and cables back there! While I was trying to get the fuel gauge out, the speedometer fell out. It was just pressed in its hole but not attached. Trying to get it back in and attached properly is a bear. I still haven't gotten it in correctly. I just found out that, instead of the nuts I used to attach the mounting bracket, I am supposed to be using these little brass knurled knobs. I wonder if I even have those?

I am happy to be making progress again with the car. Tracing each electrical problem is slow work but I am getting there. The next electrical project is to get the turn signals working. Stay tuned!